> ## Documentation Index
> Fetch the complete documentation index at: https://docs.appcharge.com/llms.txt
> Use this file to discover all available pages before exploring further.
# Configure Developer Settings
This article explains the technical settings required to connect your systems with Appcharge, including your project identity, credentials, callbacks, and webhooks. These settings allow your backend services to authenticate with Appcharge and receive or respond to platform events during player authentication, purchases, and other interactions.
You can also test callbacks and webhooks directly from the Publisher Dashboard. Testing sends a simulated Appcharge request or event to your endpoint so you can verify delivery and response handling before going live.
Test payloads don't represent real players or transactions and aren't validated against your business logic. Your system is responsible for validating and processing the payload appropriately.
## Get started
To configure your Developer Settings:
1. In the Publisher Dashboard, select the project you want to configure in the **Projects** section of the sidebar menu.
2. In the sidebar menu, under **Management**, click **Settings**.
3. Make sure you're in the **Developer Settings** tab.
If the project you selected is a Web Store that has a corresponding Game Portal, you'll see a note explaining that Developer Settings are configured in the Portal Dashboard. Click **Portal Dashboard** to open and configure the Developer Settings there.
4. Review and complete the relevant sections described below.
### Project info
View and manage your project details:
* **Project Name:** Enter or update the name of your project.
* **Project ID:** View your project ID.
* **Domain:** Enter your domain name. This field is relevant only for Appcharge Web Stores or Game Portals.
 ## Credentials
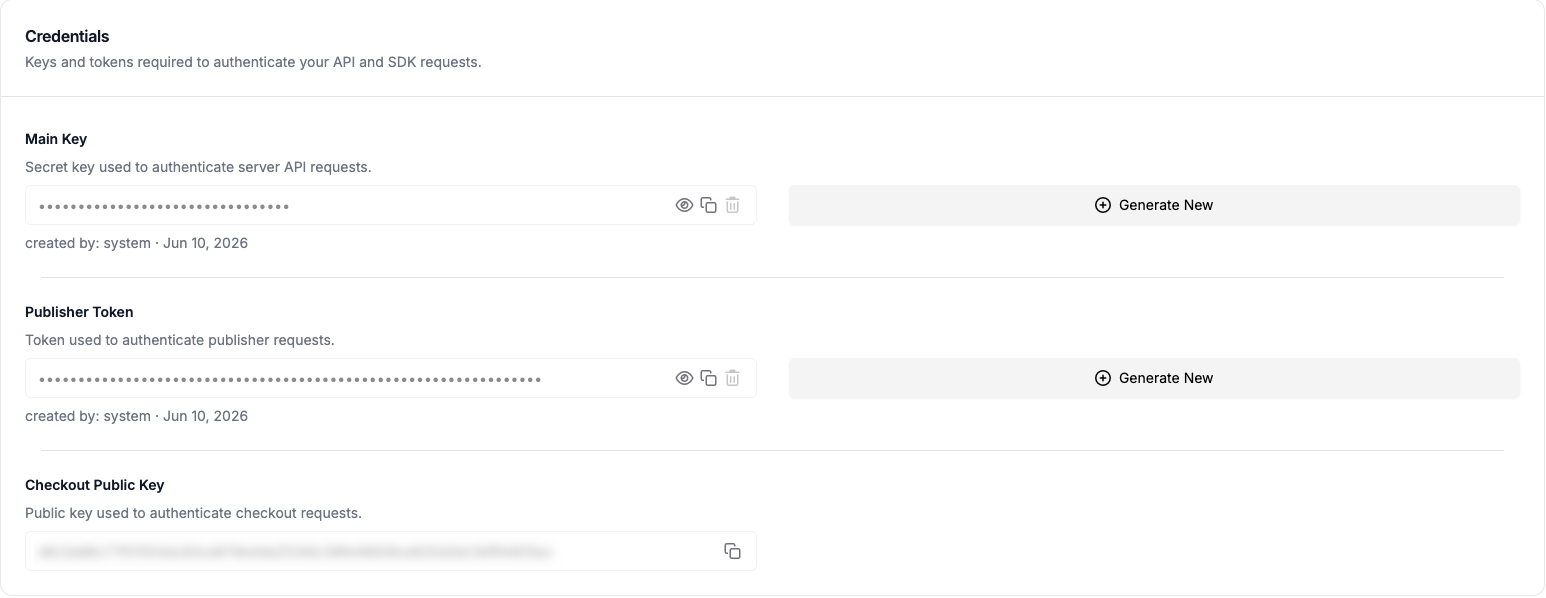
View the keys and tokens required to authenticate API, SDK, and checkout requests:
* **Main Key:**
Optional secret key used to sign and verify request payloads between your backend and Appcharge. Keep this key private and never expose it in client-side code.
For implementation details, see [Secure Communication with the Appcharge Platform](/../../merchant-of-record/security/appcharge-to-publisher-secure-communication).
* **Publisher Token:**
Token used to authenticate your system when calling Appcharge APIs, as well as for securing webhooks and callbacks.
* **Checkout Public Key:**
Public key used for checkout-related communication between your platform and Appcharge. This key can be safely embedded in frontend code. Relevant only for external web stores using Appcharge Checkout or Payment Links.
## Credentials
View the keys and tokens required to authenticate API, SDK, and checkout requests:
* **Main Key:**
Optional secret key used to sign and verify request payloads between your backend and Appcharge. Keep this key private and never expose it in client-side code.
For implementation details, see [Secure Communication with the Appcharge Platform](/../../merchant-of-record/security/appcharge-to-publisher-secure-communication).
* **Publisher Token:**
Token used to authenticate your system when calling Appcharge APIs, as well as for securing webhooks and callbacks.
* **Checkout Public Key:**
Public key used for checkout-related communication between your platform and Appcharge. This key can be safely embedded in frontend code. Relevant only for external web stores using Appcharge Checkout or Payment Links.
 ### Rotate credentials
Credential rotation lets you replace your tokens and keys without interrupting your integration. You rotate a credential by generating a new token or key, updating your integration to use it, and then invalidating the original one. When you generate a new credential, Appcharge adds it as a second active credential, so both remain valid while you transition your backend. Once you've confirmed the new credential works, you invalidate the old one so that only a single credential stays active. You can rotate both the **Main Key** and the **Publisher Token**, each described in the sections below.
Only users with Administrator or Developer roles can generate new credentials.
**When to rotate**
Generate new credentials in the following scenarios:
* Routine security rotation.
* Personnel changes.
* Suspected credential leaks.
#### Rotate the Main Key
The **Main Key** signs all outbound webhooks from Appcharge to your backend, including authentication, personalization, and awarding callbacks. When one **Main Key** is active, Appcharge signs each outbound webhook and callback request with that key and sends the signature in the `signature` header as `v1`:
```text Single Signature header theme={"system"}
signature: t=,v1=
```
When you generate a second Main Key, Appcharge temporarily signs each request with both the old and new keys. After you generate a new Main Key and before you invalidate your current one, update your backend to validate either `v1` or `v2` in the `signature` header. While two Main Keys are active, Appcharge sends dual signatures on every outbound webhook:
```text Dual Signature header theme={"system"}
signature: t=,v1=,v2=
```
When you invalidate the old Main Key, the `signature` header drops `v2` and sends only the new credential as `v1`, which then becomes the current credential. If you later generate another key, it becomes the new `v2`, while `v1` stays the same. Invalidating `v2` instead of `v1` also leaves `v1` unchanged.
Don't validate against the full `signature` header string. If you do, all webhook calls fail when the second key is generated.
Invalidating the original Main Key before updating your backend to work with the new Main Key will immediately break your entire webhook integration.
To rotate the Main Key:
1. Before you generate a new Main Key, make sure your backend validates against whichever signature version you want to use, either `v1` or `v2`. Then deploy the update and confirm it's live.
Don't rely on the new **Main Key** being specifically in the `v2` position, as it moves into `v1` after you invalidate the old **Main Key**.
2. In the **Publisher Dashboard**, go to **Settings** > **Developer Settings** > **Credentials**, then click **Generate New** next to the **Main Key**. Your current key stays active as `v1`, and Appcharge adds the new key as `v2`, signing every outbound request with both.
3. Verify that all incoming webhooks from Appcharge, including authentication, personalization, and awarding, validate correctly against the new Main Key before you continue.
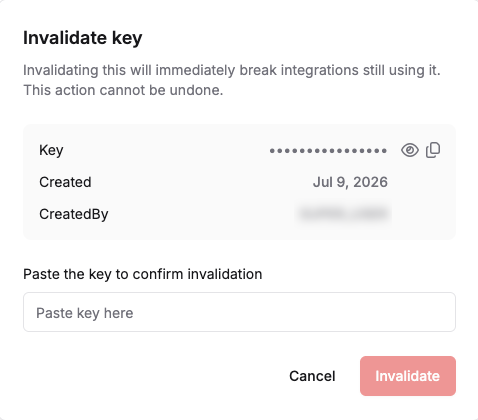
4. On the **Credentials** page, click the delete icon next to the old **Main Key** (`v1`), enter the key in the textbox, and click **Invalidate**. Appcharge then sends only the new key, which becomes your `v1`.
Invalidated credentials can't be restored.
### Rotate credentials
Credential rotation lets you replace your tokens and keys without interrupting your integration. You rotate a credential by generating a new token or key, updating your integration to use it, and then invalidating the original one. When you generate a new credential, Appcharge adds it as a second active credential, so both remain valid while you transition your backend. Once you've confirmed the new credential works, you invalidate the old one so that only a single credential stays active. You can rotate both the **Main Key** and the **Publisher Token**, each described in the sections below.
Only users with Administrator or Developer roles can generate new credentials.
**When to rotate**
Generate new credentials in the following scenarios:
* Routine security rotation.
* Personnel changes.
* Suspected credential leaks.
#### Rotate the Main Key
The **Main Key** signs all outbound webhooks from Appcharge to your backend, including authentication, personalization, and awarding callbacks. When one **Main Key** is active, Appcharge signs each outbound webhook and callback request with that key and sends the signature in the `signature` header as `v1`:
```text Single Signature header theme={"system"}
signature: t=,v1=
```
When you generate a second Main Key, Appcharge temporarily signs each request with both the old and new keys. After you generate a new Main Key and before you invalidate your current one, update your backend to validate either `v1` or `v2` in the `signature` header. While two Main Keys are active, Appcharge sends dual signatures on every outbound webhook:
```text Dual Signature header theme={"system"}
signature: t=,v1=,v2=
```
When you invalidate the old Main Key, the `signature` header drops `v2` and sends only the new credential as `v1`, which then becomes the current credential. If you later generate another key, it becomes the new `v2`, while `v1` stays the same. Invalidating `v2` instead of `v1` also leaves `v1` unchanged.
Don't validate against the full `signature` header string. If you do, all webhook calls fail when the second key is generated.
Invalidating the original Main Key before updating your backend to work with the new Main Key will immediately break your entire webhook integration.
To rotate the Main Key:
1. Before you generate a new Main Key, make sure your backend validates against whichever signature version you want to use, either `v1` or `v2`. Then deploy the update and confirm it's live.
Don't rely on the new **Main Key** being specifically in the `v2` position, as it moves into `v1` after you invalidate the old **Main Key**.
2. In the **Publisher Dashboard**, go to **Settings** > **Developer Settings** > **Credentials**, then click **Generate New** next to the **Main Key**. Your current key stays active as `v1`, and Appcharge adds the new key as `v2`, signing every outbound request with both.
3. Verify that all incoming webhooks from Appcharge, including authentication, personalization, and awarding, validate correctly against the new Main Key before you continue.
4. On the **Credentials** page, click the delete icon next to the old **Main Key** (`v1`), enter the key in the textbox, and click **Invalidate**. Appcharge then sends only the new key, which becomes your `v1`.
Invalidated credentials can't be restored.
 #### Rotate the Publisher Token
The Publisher Token authenticates inbound requests from your backend to Appcharge. Rotating the Publisher Token doesn't affect any webhook signature format or header structure. Both tokens are accepted simultaneously during rotation, and no backend preparation is required before generating the new one.
To rotate the Publisher Token:
1. In the **Publisher Dashboard**, go to **Settings** > **Developer Settings** > **Credentials**, then click the **Generate New** button next to the **Publisher Token**.
2. Update your backend to send the new token on all API calls to Appcharge.
3. Deploy your changes and validate that all calls to Appcharge are working correctly.
4. Return to the **Credentials** page and invalidate the old **Publisher Token**.
5. Click the delete icon next to the **Publisher Token**, then copy the key into the textbox and click **Invalidate**.
Invalidated credentials can't be restored.
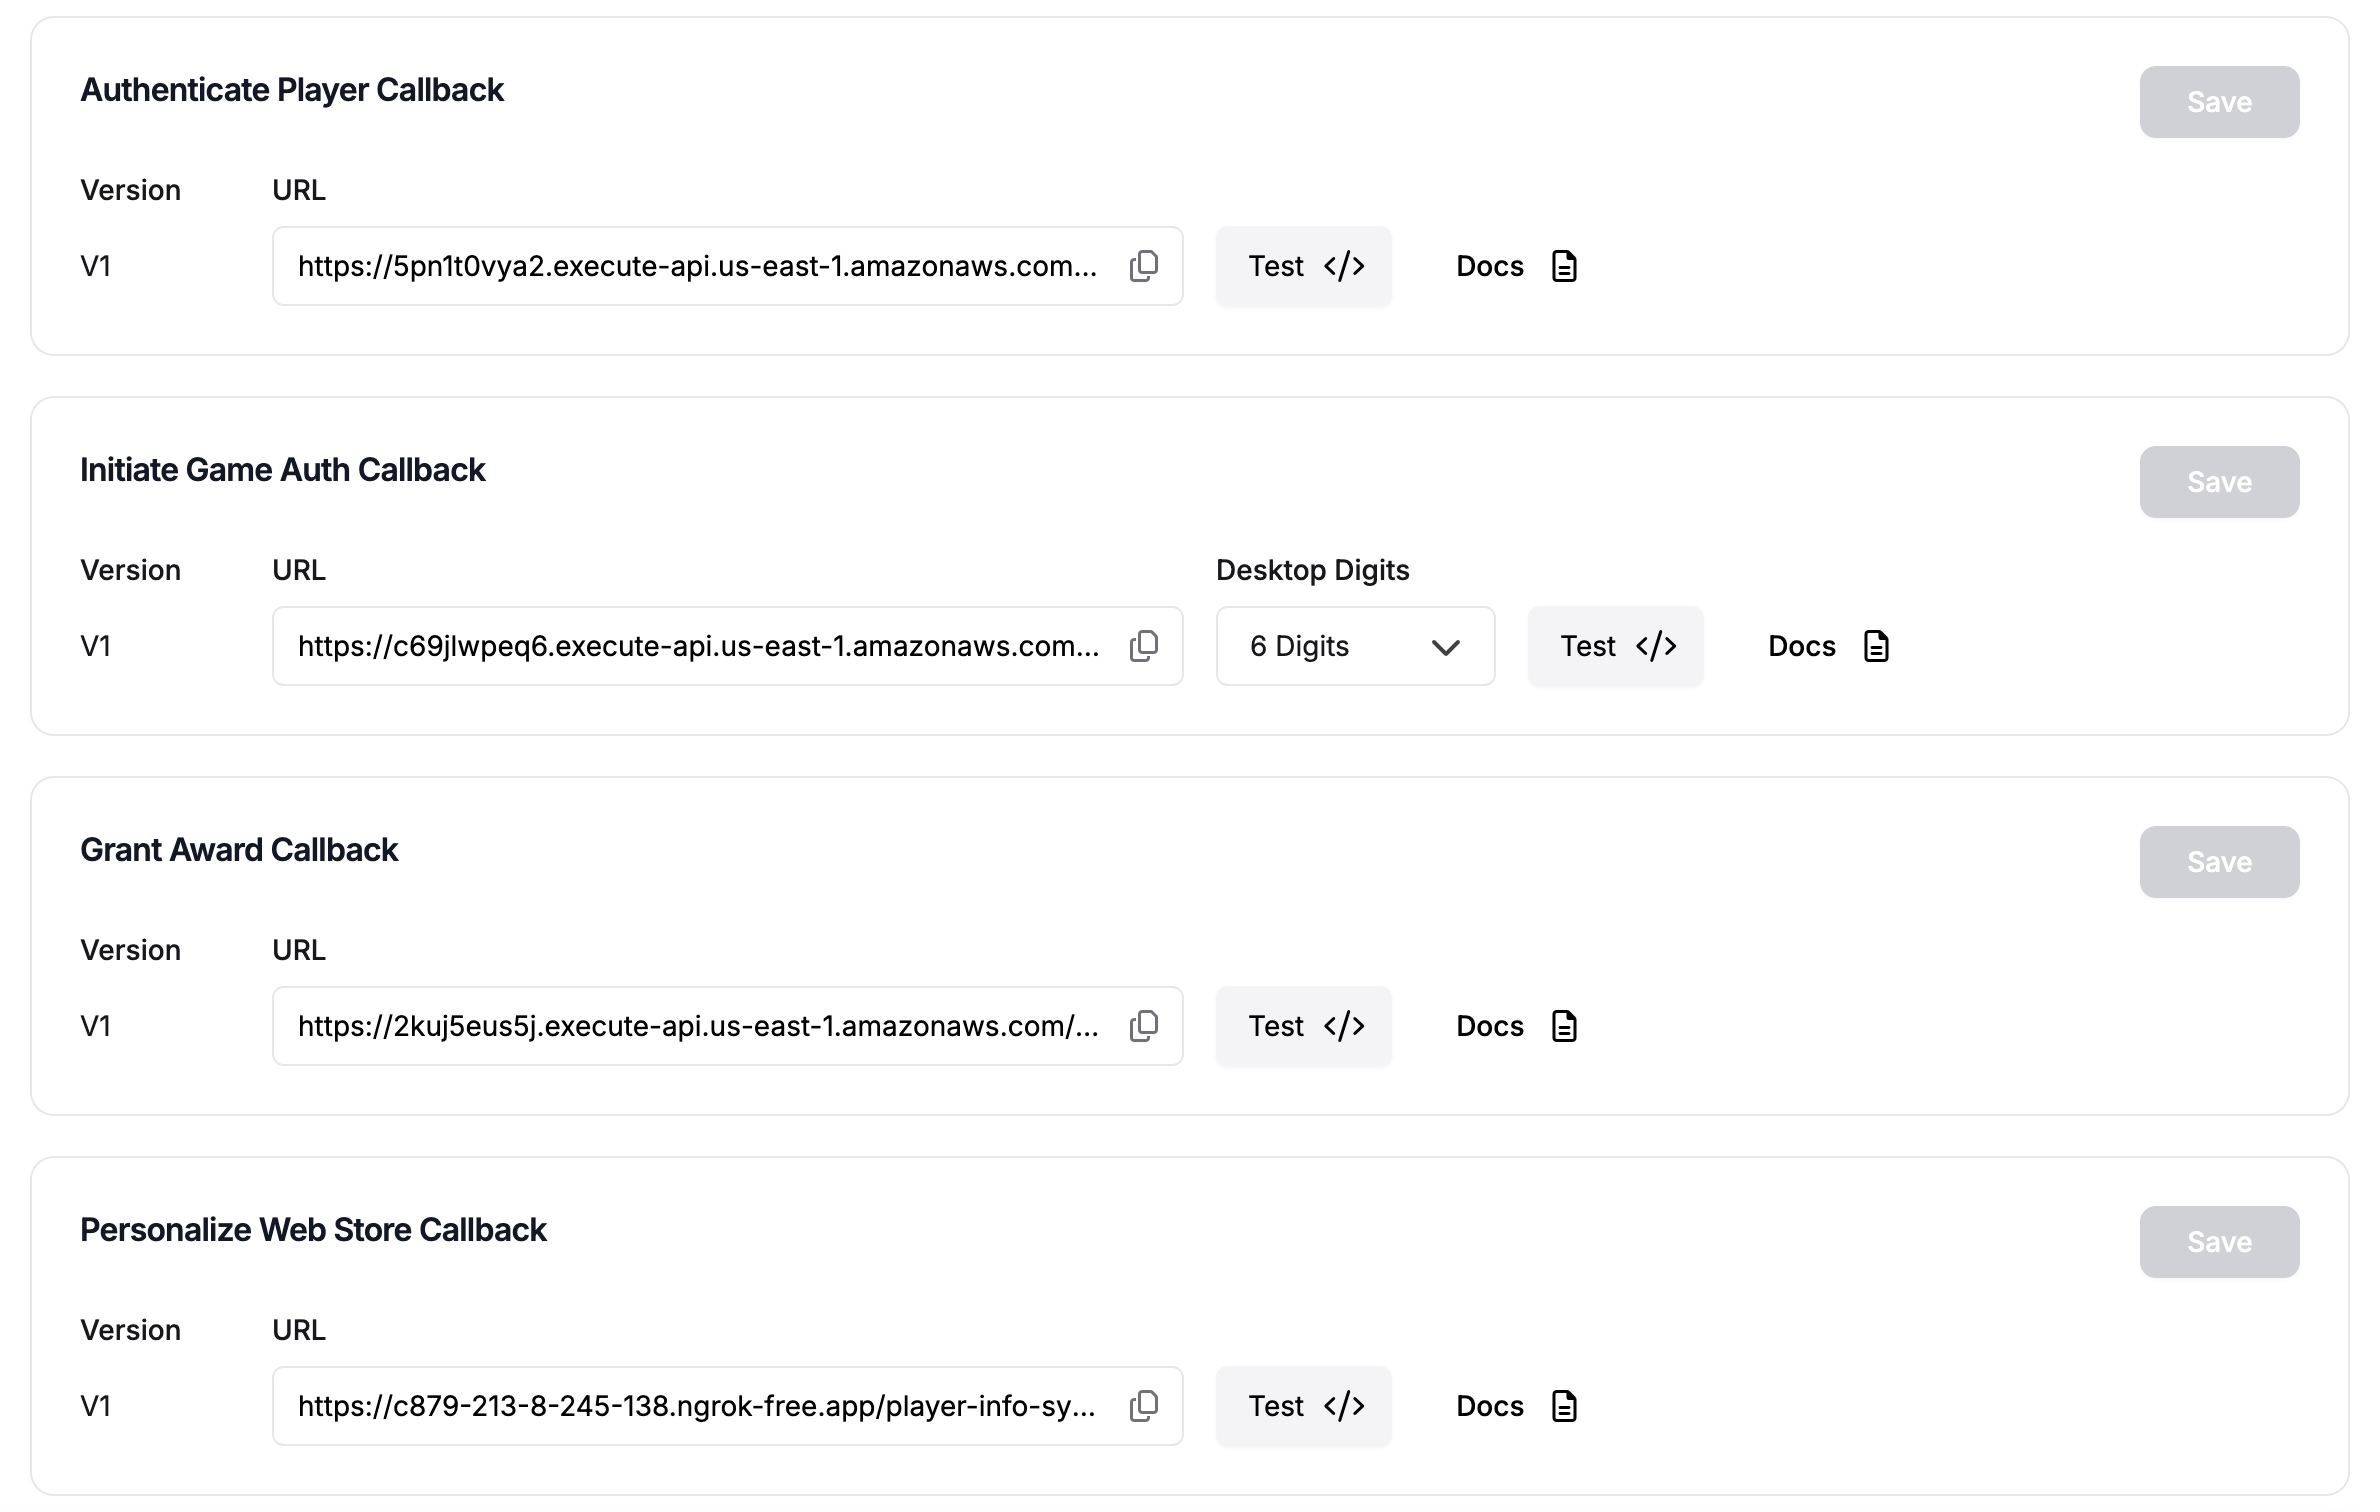
## Callbacks
Callbacks allow Appcharge to communicate with your backend systems. They're synchronous requests that require an immediate response from your system during a user flow, such as when authenticating a player.
To implement a callback, create and expose a publicly accessible HTTPS endpoint that follows the structure defined in the documentation. When Appcharge calls the configured endpoint, it instructs your system to perform a specific action.
Each callback can be configured and tested directly from the Publisher Dashboard before going live.
This callback is relevant only for Appcharge Web Stores, Game Portals, and Parking Domains.
To configure and test the callback:
1. Enter your endpoint URL in the **URL** field, and then click **Save**.
2. Click **Docs** to view the available callback fields and their definitions. You can refer to this documentation while testing the callback.
3. Click **Test** to open the test configuration panel.
4. Use the **Hide optional fields** checkbox to simplify the payload view. You can uncheck it at any time to include optional properties in your test.
5. In the **Player Authentication Method** drop-down menu, select the player authentication method you want to test. The available fields update dynamically based on the selected authentication type.
6. Customize the test payload by editing required and optional properties. Use these fields to simulate different player authentication methods and validate your endpoint’s behavior.
7. In the top-right corner, click:
* **Test** to send the request directly from the Publisher Dashboard, or
* **Copy cURL** to run the request externally.
8. Verify that your endpoint returns the expected HTTP status code and response body.
This callback is relevant only when implementing Game Redirect Login for Appcharge Web Stores and Game Portals. [Set up Game Redirect Login](/../../webstore/player-authentication/game-redirect-login/set-up-game-redirect-login).
To configure and test the callback:
1. Enter your endpoint URL in the **URL** field, and then click **Save**.
2. Click **Docs** to view the available callback fields and their definitions. You can refer to this documentation while testing the callback.
3. Click **Test** to open the test configuration panel.
4. Use the **Hide optional fields** checkbox to simplify the payload view. You can uncheck it at any time to include optional properties in your test.
5. In the **Desktop Digits** drop-down menu, select one of the following:
* **4 Digits:** Generates a 4-digit authentication code.
* **6 Digits:** Generates a 6-digit authentication code.
* **Mobile Only:** Enables authentication for mobile devices only.
6. Customize the test payload by editing required and optional properties. Use these fields to simulate different devices and validate your endpoint’s behavior.
7. In the top-right corner, click:
* **Test** to send the request directly from the Publisher Dashboard, or
* **Copy cURL** to run the request externally.
8. Verify that your endpoint returns the expected HTTP status code and response body.
To configure and test the callback:
1. Enter your endpoint URL in the **URL** field, and then click **Save**.
2. Click **Docs** to view the available callback fields and their definitions. You can refer to this documentation while testing the callback.
3. Click **Test** to open the test configuration panel.
4. Use the **Hide optional fields** checkbox to simplify the payload view. You can uncheck it at any time to include optional properties in your test.
5. Customize the test payload by editing required and optional properties. Use these fields to simulate the purchase or collection of an offer in your checkout and validate your endpoint’s behavior.
6. In the top-right corner, click:
* **Test** to send the request directly from the Publisher Dashboard, or
* **Copy cURL** to run the request externally.
7. Verify that your endpoint returns the expected HTTP status code and response body.
This callback is relevant only if you choose to implement real-time personalization for your Appcharge Web Store.
To configure and test the callback:
1. Enter your endpoint URL in the **URL** field, and then click **Save**.
2. Click **Docs** to view the available callback fields and their definitions. You can refer to this documentation while testing the callback.
3. Click **Test** to open the test configuration panel.
4. Use the **Hide optional fields** checkbox to simplify the payload view. You can uncheck it at any time to include optional properties in your test.
5. Customize the test payload by editing required and optional properties. Use these fields to simulate different players and validate your endpoint’s behavior.
6. In the top-right corner, click:
* **Test** to send the request directly from the Publisher Dashboard, or
* **Copy cURL** to run the request externally.
7. Verify that your endpoint returns the expected HTTP status code and response body.
#### Rotate the Publisher Token
The Publisher Token authenticates inbound requests from your backend to Appcharge. Rotating the Publisher Token doesn't affect any webhook signature format or header structure. Both tokens are accepted simultaneously during rotation, and no backend preparation is required before generating the new one.
To rotate the Publisher Token:
1. In the **Publisher Dashboard**, go to **Settings** > **Developer Settings** > **Credentials**, then click the **Generate New** button next to the **Publisher Token**.
2. Update your backend to send the new token on all API calls to Appcharge.
3. Deploy your changes and validate that all calls to Appcharge are working correctly.
4. Return to the **Credentials** page and invalidate the old **Publisher Token**.
5. Click the delete icon next to the **Publisher Token**, then copy the key into the textbox and click **Invalidate**.
Invalidated credentials can't be restored.
## Callbacks
Callbacks allow Appcharge to communicate with your backend systems. They're synchronous requests that require an immediate response from your system during a user flow, such as when authenticating a player.
To implement a callback, create and expose a publicly accessible HTTPS endpoint that follows the structure defined in the documentation. When Appcharge calls the configured endpoint, it instructs your system to perform a specific action.
Each callback can be configured and tested directly from the Publisher Dashboard before going live.
This callback is relevant only for Appcharge Web Stores, Game Portals, and Parking Domains.
To configure and test the callback:
1. Enter your endpoint URL in the **URL** field, and then click **Save**.
2. Click **Docs** to view the available callback fields and their definitions. You can refer to this documentation while testing the callback.
3. Click **Test** to open the test configuration panel.
4. Use the **Hide optional fields** checkbox to simplify the payload view. You can uncheck it at any time to include optional properties in your test.
5. In the **Player Authentication Method** drop-down menu, select the player authentication method you want to test. The available fields update dynamically based on the selected authentication type.
6. Customize the test payload by editing required and optional properties. Use these fields to simulate different player authentication methods and validate your endpoint’s behavior.
7. In the top-right corner, click:
* **Test** to send the request directly from the Publisher Dashboard, or
* **Copy cURL** to run the request externally.
8. Verify that your endpoint returns the expected HTTP status code and response body.
This callback is relevant only when implementing Game Redirect Login for Appcharge Web Stores and Game Portals. [Set up Game Redirect Login](/../../webstore/player-authentication/game-redirect-login/set-up-game-redirect-login).
To configure and test the callback:
1. Enter your endpoint URL in the **URL** field, and then click **Save**.
2. Click **Docs** to view the available callback fields and their definitions. You can refer to this documentation while testing the callback.
3. Click **Test** to open the test configuration panel.
4. Use the **Hide optional fields** checkbox to simplify the payload view. You can uncheck it at any time to include optional properties in your test.
5. In the **Desktop Digits** drop-down menu, select one of the following:
* **4 Digits:** Generates a 4-digit authentication code.
* **6 Digits:** Generates a 6-digit authentication code.
* **Mobile Only:** Enables authentication for mobile devices only.
6. Customize the test payload by editing required and optional properties. Use these fields to simulate different devices and validate your endpoint’s behavior.
7. In the top-right corner, click:
* **Test** to send the request directly from the Publisher Dashboard, or
* **Copy cURL** to run the request externally.
8. Verify that your endpoint returns the expected HTTP status code and response body.
To configure and test the callback:
1. Enter your endpoint URL in the **URL** field, and then click **Save**.
2. Click **Docs** to view the available callback fields and their definitions. You can refer to this documentation while testing the callback.
3. Click **Test** to open the test configuration panel.
4. Use the **Hide optional fields** checkbox to simplify the payload view. You can uncheck it at any time to include optional properties in your test.
5. Customize the test payload by editing required and optional properties. Use these fields to simulate the purchase or collection of an offer in your checkout and validate your endpoint’s behavior.
6. In the top-right corner, click:
* **Test** to send the request directly from the Publisher Dashboard, or
* **Copy cURL** to run the request externally.
7. Verify that your endpoint returns the expected HTTP status code and response body.
This callback is relevant only if you choose to implement real-time personalization for your Appcharge Web Store.
To configure and test the callback:
1. Enter your endpoint URL in the **URL** field, and then click **Save**.
2. Click **Docs** to view the available callback fields and their definitions. You can refer to this documentation while testing the callback.
3. Click **Test** to open the test configuration panel.
4. Use the **Hide optional fields** checkbox to simplify the payload view. You can uncheck it at any time to include optional properties in your test.
5. Customize the test payload by editing required and optional properties. Use these fields to simulate different players and validate your endpoint’s behavior.
6. In the top-right corner, click:
* **Test** to send the request directly from the Publisher Dashboard, or
* **Copy cURL** to run the request externally.
7. Verify that your endpoint returns the expected HTTP status code and response body.
 ## Webhooks
Webhooks allow your systems to receive notifications when specific events occur in your Appcharge products.
Unlike callbacks, webhooks are asynchronous. Appcharge sends the event after the action occurs, and your system processes it independently.
To use a webhook, create and expose a publicly accessible HTTPS endpoint that can receive event notifications and process them according to the webhook schema defined in the documentation.
Configure and test the webhook directly from the Publisher Dashboard before going live:
To configure and test the webhook:
1. Enter your endpoint URL in the **URL** field, and then click **Save**.
2. Click **Docs** to view the event schema and field descriptions for the events you want to test. Refer to this documentation while testing different event types.
3. Click **Test** to open the test configuration panel.
4. Use the **Hide optional fields** checkbox to simplify the payload view. You can uncheck it at any time to include optional properties in your test.
5. In the **Event Name** drop-down menu, select the event you want to test. The available fields update dynamically based on the selected event type.
6. Customize the test payload by editing the event's properties. Modify required and optional fields to simulate different scenarios and validate how your endpoint handles various webhook payloads.
7. In the top-right corner, click:
* **Test** to send the event directly from the Publisher Dashboard, or
* **Copy cURL** to run the request externally.
8. Verify that your webhook endpoint receives the event and returns the expected response.
## Webhooks
Webhooks allow your systems to receive notifications when specific events occur in your Appcharge products.
Unlike callbacks, webhooks are asynchronous. Appcharge sends the event after the action occurs, and your system processes it independently.
To use a webhook, create and expose a publicly accessible HTTPS endpoint that can receive event notifications and process them according to the webhook schema defined in the documentation.
Configure and test the webhook directly from the Publisher Dashboard before going live:
To configure and test the webhook:
1. Enter your endpoint URL in the **URL** field, and then click **Save**.
2. Click **Docs** to view the event schema and field descriptions for the events you want to test. Refer to this documentation while testing different event types.
3. Click **Test** to open the test configuration panel.
4. Use the **Hide optional fields** checkbox to simplify the payload view. You can uncheck it at any time to include optional properties in your test.
5. In the **Event Name** drop-down menu, select the event you want to test. The available fields update dynamically based on the selected event type.
6. Customize the test payload by editing the event's properties. Modify required and optional fields to simulate different scenarios and validate how your endpoint handles various webhook payloads.
7. In the top-right corner, click:
* **Test** to send the event directly from the Publisher Dashboard, or
* **Copy cURL** to run the request externally.
8. Verify that your webhook endpoint receives the event and returns the expected response.
